- CUTOFF PROJECT -

- Project name: Stamping Cutoff Detection – Innovative anomaly detection system for stamped parts
- Project code: POCI-01-0247-FEDER-038445
- Main Objective: Strengthening Research, Technological Development and Innovation
- Region of intervention: Alentejo
- Beneficiary entity: Toolpresse – Peças Metálicas por Prensagem, Lda.
- Approval date: 24-04-2019
- Start date: 14-10-2019
- Ending date: 13-09-2021
- Total eligible cost: 338.589,76€
- Financial support from the European Union: FEDER – 226.735,12€
- OBJETIVES
- The purpose of this project is to investigate and develop a system for detecting the presence of defects during the stamping process and which automatically and immediately stops the machine-tool system, to allow the operator to intervene to prevent the defect.
- The proposed methodology is based on:
- - In the analysis of the factors that cause the occurrence of defects;
- - In the development of a system to detect the presence of defects in the process;
- - The integration of the defect detection system with the means of production in a reliable way and its integration with the current control system of the existing stamping process and, finally, its integration in the rest of the production control monitoring system.
- The production process for which the defect detection solution is intended to be implemented is the sheet metal cold forming process available at Toolpresse for the production of metal components.
- Various pieces of equipment are involved in this process, namely: press, tool, plate feeding or handling system and lubrication oil feeding system for the cold forming process.
- ANALYSIS OF THE MAIN DEFECTS AND CAUSES OF THEIR OCCURRENCE
- An assessment was carried out of the main defects in sheet metal stamped components, of various thicknesses and steel classes, resulting from Toolpresse's activity, and which constitute the representative defects in its stamping process.
- Main defects:
- - Cracks (generally occurs when the formability of the material is limited)
- - Wrinkling (caused by high compressive stresses parallel to the surface on the sheet)
- - Marking lines (occur when material experiences high tensile stresses as it flows over tool surfaces)
- - Surface imprints (occur when there are material residues on the tool elements that are in contact with the sheet)
- - Scrap marks (occur when there is material that was previously cut at a cutting station and that did not exit the tool through the die hole, remaining in the work area)
- - Burrs (occur when the cutting gap between the cutting elements (punch and die) is not adequate)

- PROPOSED SOLUTION
- After analyzing the problem, and taking into account aspects such as versatility, complexity, reliability, flexibility, scalability, an inspection system based on artificial vision (image analysis) was considered and proposed.
- The proposed solution involves the acquisition of images of the part produced in continuous and subsequent processing in the identification (yes or no) of defects typically associated with the process. The existence, detection, of at least one defect (characteristic that fits the definition of process defect) causes the sending of an electrical signal that triggers an alarm.
- The system is then composed of:
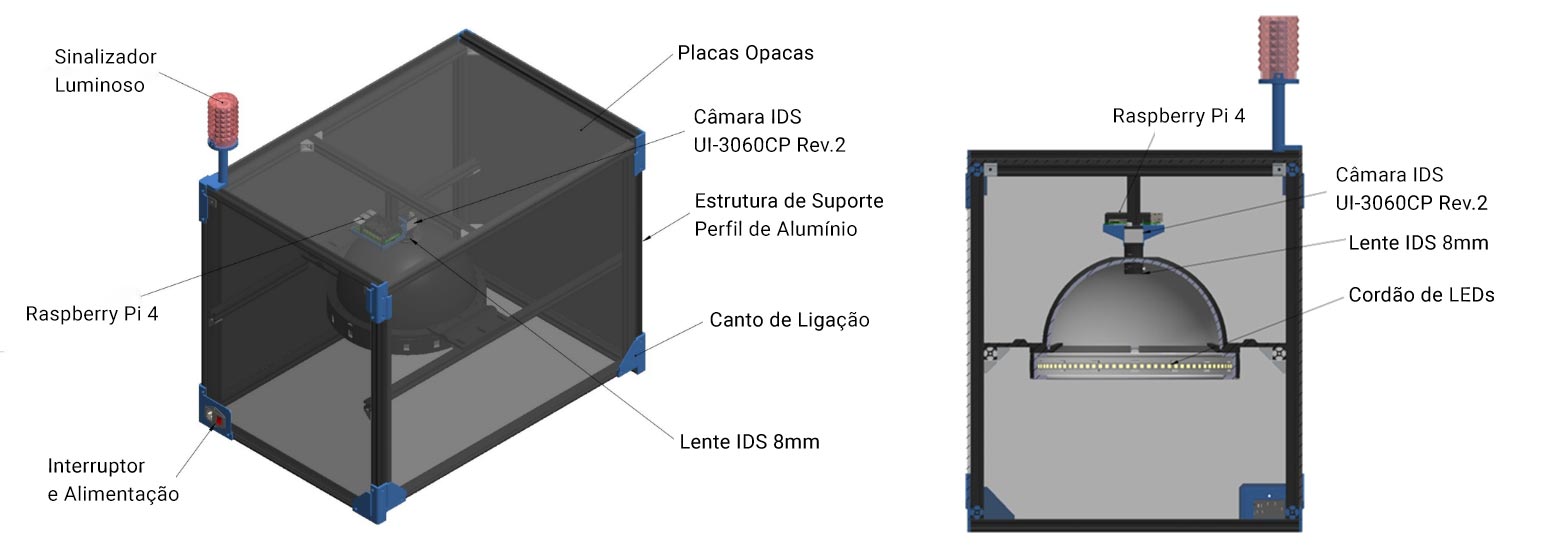
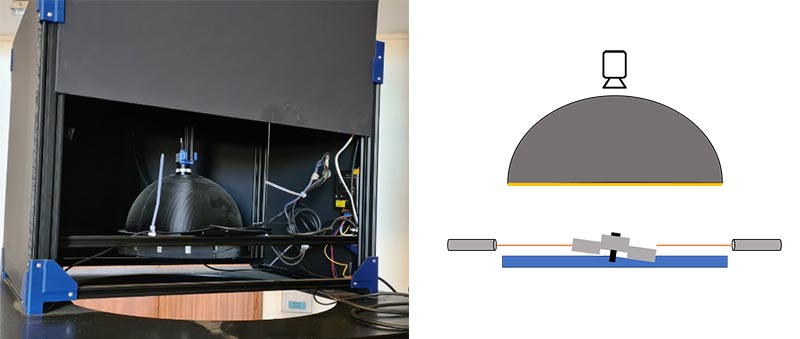
- - Transport system, consisting of a belt conveyor, which transports the produced part from the production area to the unloading area, passing through the image acquisition area, - Image acquisition system consisting of structure, camera, lens, lighting , presence sensors and computational unit for the respective coordination of all the activities of the defect detection system, from triggering the image acquisition hardware, data storage and image processing tasks, to triggering the sound and/or visual signal (Results presentation).
- SOLUTION VALIDATION
- Initially, it was planned to develop the solution to detect scrap marks, however, with the development of surface treatments it is now possible to reduce the cutting gap without causing premature wear of the punch (which was the factor that made it necessary to make certain cuts in two times, causing the possibility of leaks), and thus eliminating anomalies due to scrap marks.
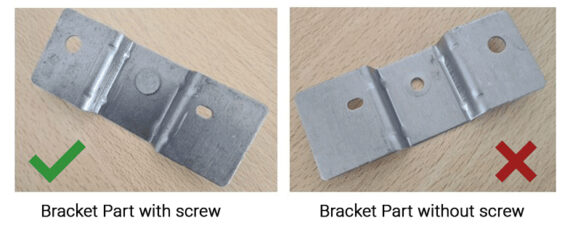
- The defect chosen to test the solution was then changed to the absence of screws in the bracket parts (clamps). Brackets (clamps) are aluminum or steel parts that Toolpresse produces for the automotive industry. These parts are used in multiple fastening functions, and in the case of parts produced by Toolpresse, they are supplied to Tier1 customers who supply power windows to OEMs.
- These parts have a crimped screw, whose crimping operation is performed in tool, by an automatic feeding system. It often happens that the screw is not driven in correctly. Such a failure causes the occurrence of a part without a screw, which is often sent to the customer as it is not detected.
- An anomaly detection algorithm was developed, which was validated with about 1000 parts in two groups, one of defective parts and the other of approved parts. A tool was built to produce the defective sample parts, given the impossibility of obtaining these defective parts in sufficient numbers with the means available for series production within the stipulated time for this purpose.
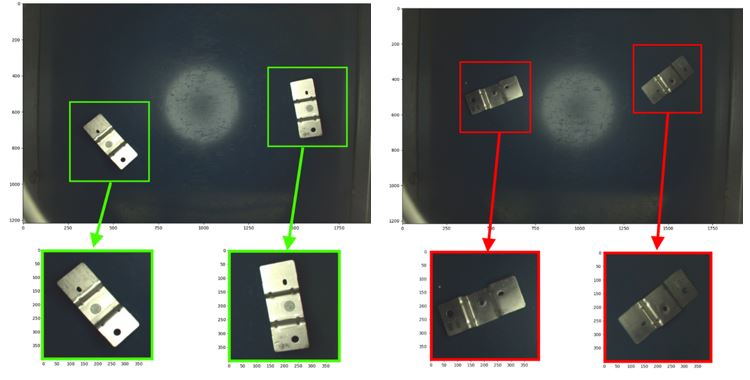
- More than one image of the same part can be acquired, it is only processed more than once, with no harm to the system.
- This can be seen as a reinforcement of the identification process.
- The alert system consisting of a light signal and an audible signal, when a defect is positively identified. After the defect is identified, the system will stop the advancement of the mat fabric in order to prevent the defective part from being placed in the parts box at the exit of the mat.
- After the alert, the operator stops the production and removes the defective part that is under the carpet screen.
- With this solution, the detection of defects does not require changes to machines and tools as it can be used for other tools (or machine-tool sets) with similar defects regardless of their complexity. New features that define new defects can also be added.

19/05/2022